elfacun
Elfacun Chess Interface Module
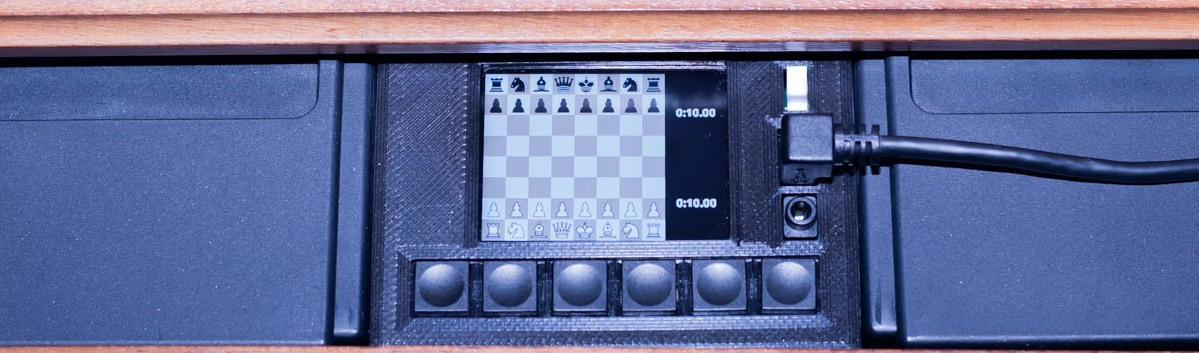
Operation manual
Table of contents:
- Powering the module
- Startup and modes of Operation
- Configure the module
- Piece preparation
- Piece programming
- Setting up the board
- Play with Reversed board
- Moving pieces
- Promotion
- Take back movements
- Using with a DGT 3000 clock
- Lichess mode
- Using Elfacun with Picochess
- Connecting via USB
- Connecting via Bluetooth
- Connecting via BLE
- Adjusting buzzer volume
- Update Elfacun Software
- Using Elfacun with Graham O’Neill drivers
- Force passive mode
- Hold mode
- Adjust BLE power
- Adjust sound tones
- On-screen led indications
- Chessnut mode
- Scally homage screen
- Chess 960 mode
- Chessconnect mode
- Dual leds mode
- Adjust screen brightness
- Enable or disable power from board
Powering the module
Once inserted into the board, there are two major possible configurations to power the module:
In standalone mode, you will have only Elfacun plugged into the board. You need to power the module from its USB port, regarless of if you are connecting an app via USB or you aren’t. The module can be powered from a computer USB port as well as from a regular USB wall adapter. You can also have the board powered if you want to, but power from the board won’t be used by the module.
In passive mode you will have Elfacun plugged alongside an original module. In that situation you will need both, power from Elfacun USB port and powering the board as you would regulary do to operate the original module. Be sure that you start the original module before you start Elfacun, because it will need to detect that the original module is operating to be able to enter in this special mode. If you start Elfacun before starting the original module, both will be trying to scan the board at the same time and neither will work properly.
There are some Mephisto boards (identified as type 4b in the schach-computer.info wiki) that aren’t voltage-regulated and put the full wall adapter voltage into the modules. I don’t recommend using Elfacun with those boards powered, as it will have to support an unknown voltage and cannot be guaranteed to work or not to be damaged. More information about the boards power supplies can be found here: https://www.schach-computer.info/wiki/index.php?title=Stromversorgung_Mephisto_Modulare_Reihe
Startup and modes of Operation
The module can be started in three different modes:
- Mode A, compatible with most apps (except Millennium-compatible apps via USB)
- Mode B, compatible with most Millennium-compatible apps, including USB
- Lichess mode
The main difference between modes A and B is that in mode A the serial port is initialized to 9600 bauds, while in mode B it is initialized to 38400 bauds. If you are using the module with Bluetooth or BLE, all the apps should work the same on mode A, as the appropiate protocol will be automatically detected.
So it is recommended to start the module on mode A unless you want to use Millennium-compatible apps via USB, in wich case mode B is mandatory.
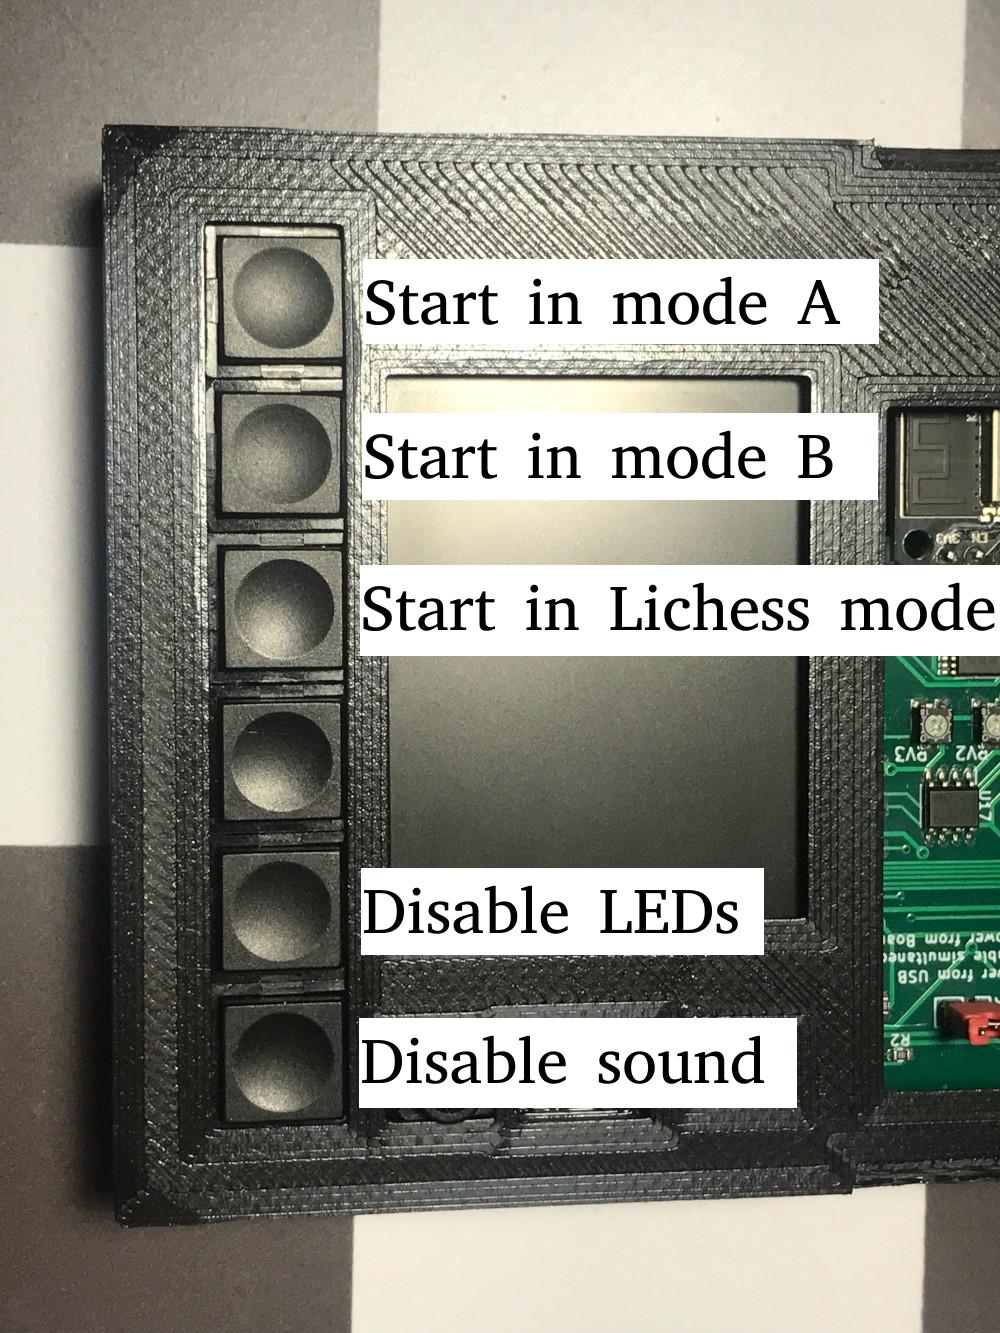
The default mode can be changed by the user (see “Configuration”). If you want to boot the module in a non-default mode you can make so by keeping pressed while starting one or more of the module buttons:
- Keep pressed first button: Start in mode A
- Keep pressed second button: Start in mode B
- Keep pressed third button: Start in Lichess mode
Additionally you can keep pressed the following buttons to modify sound and LED operation
- Keep pressed fifth button: Start with board LEDs disabled
- Keep pressed sixth button: Start with sound disabled
Configure the module
You can make permanent changes to the module configuration by editing a settings.txt text file, putting it into the SD card and starting the module with the card inserted. When started, the values from the file will be permanently stored in the module.


The piece scanning won’t work while the SD card is inserted, so please remove the card after successfully configuring the module.
A minimal configuration is needed if you want to use Lichess mode, that is your WIFI ssid and credentials, and your Lichess API token.
The values you can edit in that file are:
- base.mac.address: If you want to change the hardware address of the module
- mode.default: default mode
- mode.a.bt.advertised.name: The name you will see when pairing the module via Bluetooth in mode A
- mode.b.bt.advertised.name: The name you will see when pairing the module via Bluetooth in mode B
- buzzer.enabled: Enable or disable sound by default
- leds.enabled: Enable or disable the board LEDs by default
Some parameters that modify how Elfacun identifies itself in mode A. Usually you won’t need to change this:
- mode.a.trademark
- mode.a.version.major
- mode.a.version.minor
- mode.a.clock.version.major
- mode.a.clock.version.minor
- mode.a.serial.number.long
- mode.a.serial.number.short
Settings needed for Lichess mode, see Lichess Mode manual section for more information
- lichess.wifi.ssid
- lichess.wifi.password
- lichess.wifi.authtoken
- lichess.board.autoinvert
Settings to customize each of the 6 pre-defined challenges for Lichess. When in Lichess.TV you can launch one of those predefined challenges using the corresponding key (the first key is the leftmost one).
- lichess.mode.X.time
- lichess.mode.X.increment
- lichess.mode.X.color
- lichess.mode.X.rated
- lichess.mode.X.elo
A more detailed description and a list of valid values for each parameter are included in the sample settings.txt file
When you edit settings.txt, do not leave spaces between the keys, equals and values. This is OK:
lichess.board.autoinvert=false
This is NOT OK:
lichess.board.autoinvert = false
While experimenting with Lichess settings, I recommend you have at hand a connected app or the session initiated on the web site, as if you launch challenges repeatedly and don’t play the games, you could be temporarily banned.
Piece preparation
This is optional and only required if you want to be able to scan your pieces with the module.
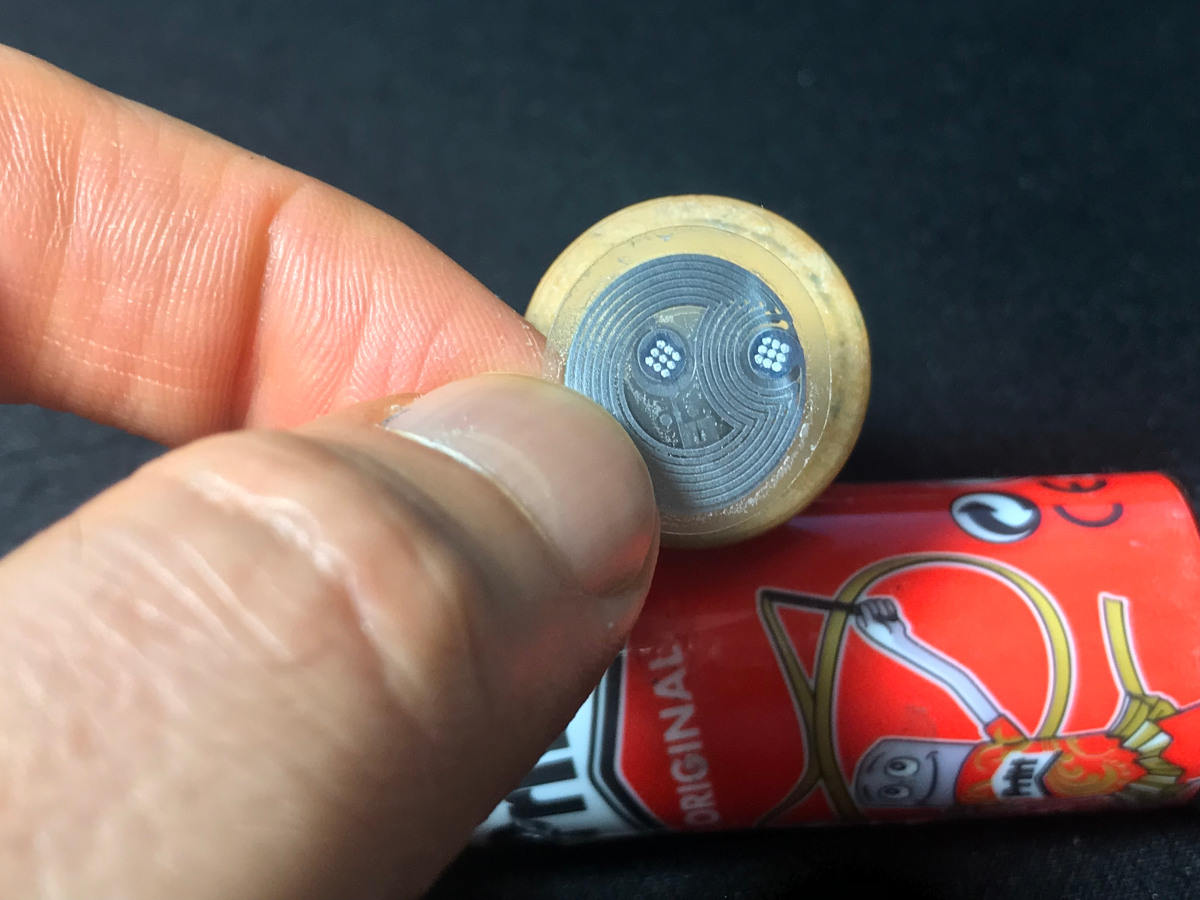
You have been provided with 50 RFID tags that can be programmed and read by the module. You need to modify your pieces to place one tag under each piece.
In case you want to buy more tags, the tag specification is NTAG213, 18mm diameter.
The provided tags are 18mm. wide, so they are a good fit for the Exclusive and München original pieces, but maybe a little big for the Modular pieces, specially for the pawns.
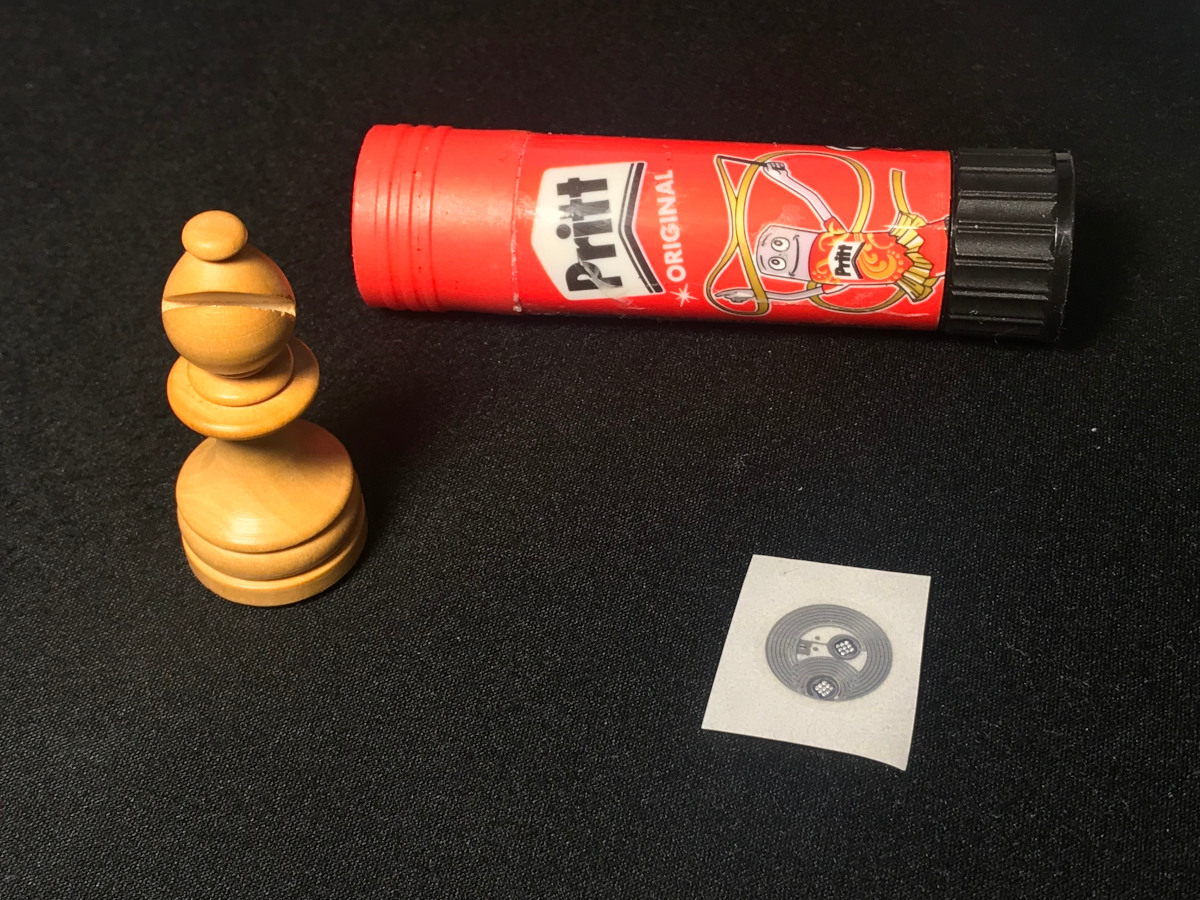
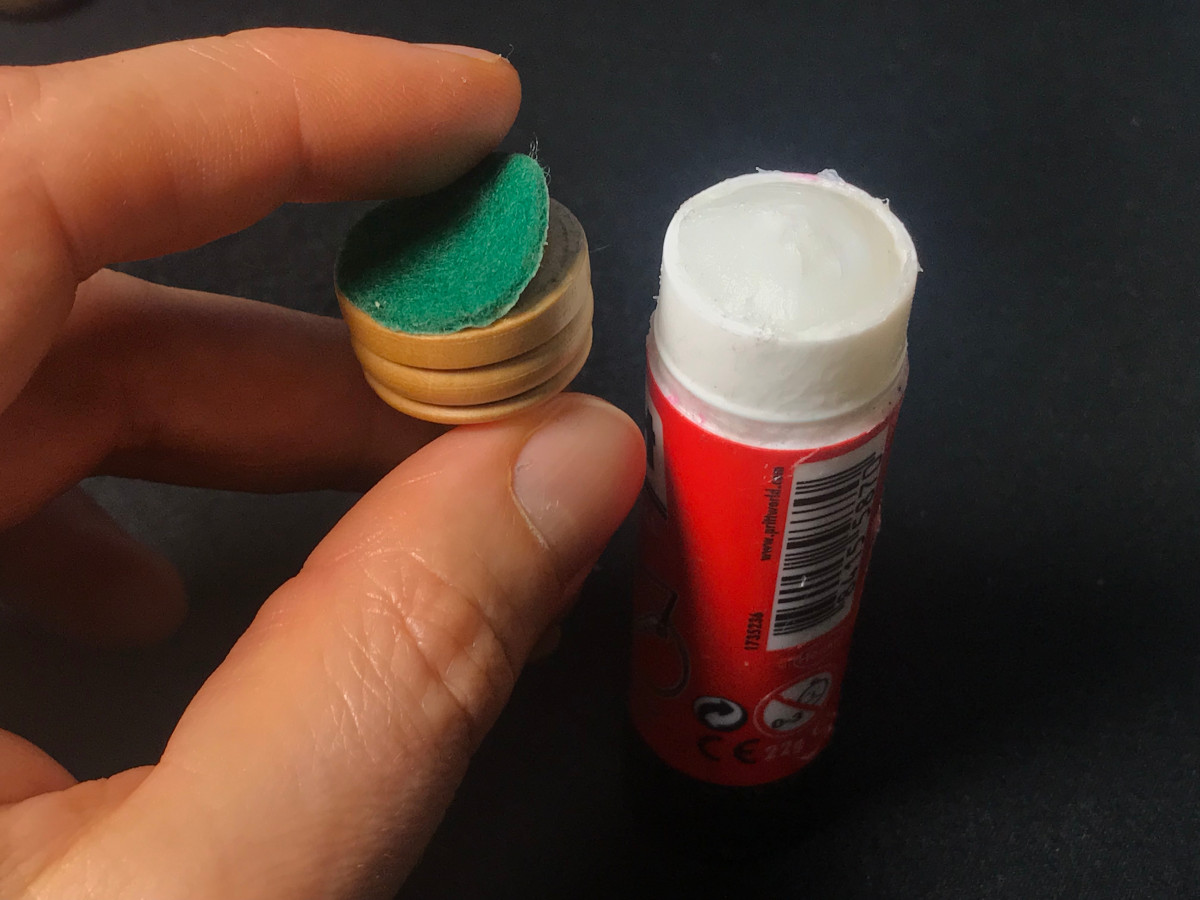
For fitting the tags you need to remove the felt under your piece. If you are careful you will be able to glue back the same felt later. You can use something like a small flat screwdriver to gently pull the felt in little steps without shredding the felt or damaging the piece.
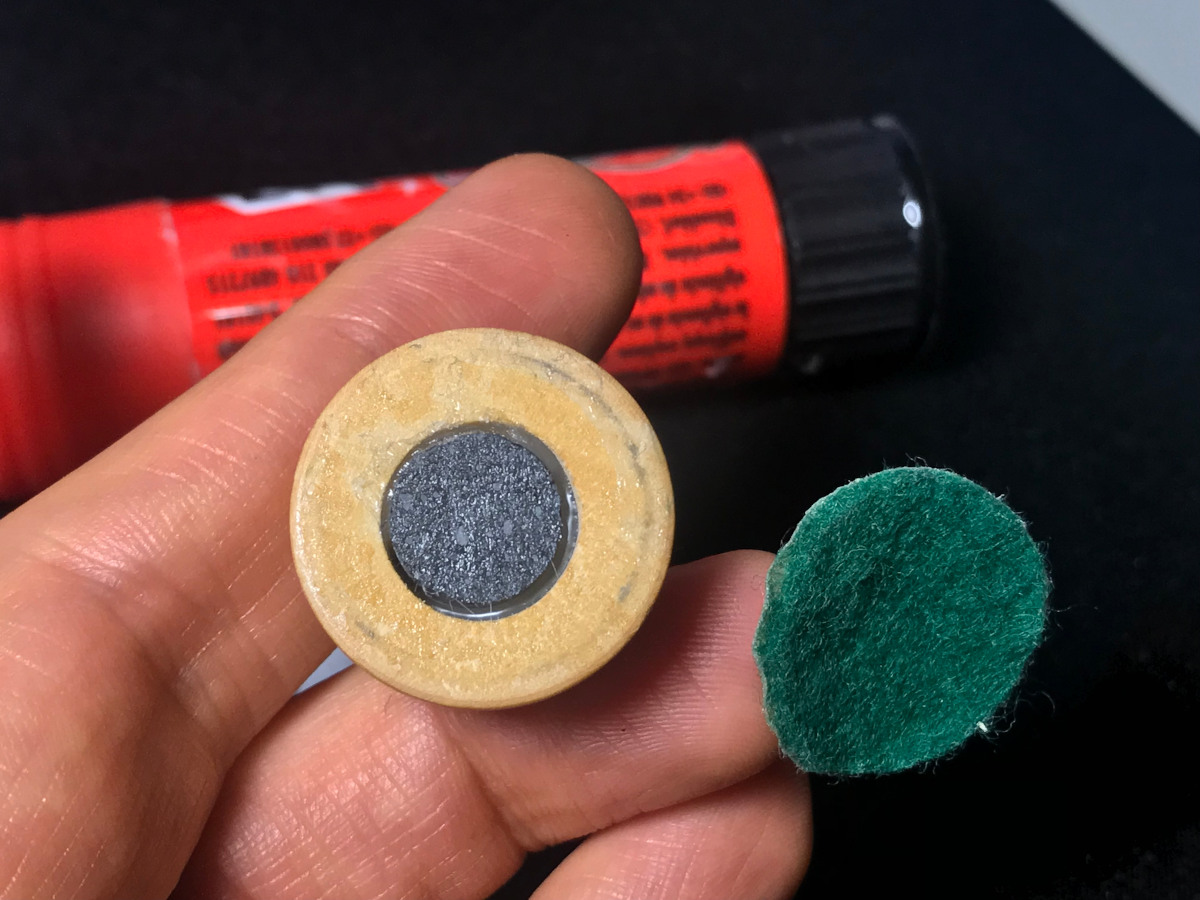
With the felt removed, stick one tag under the piece. The tags are auto-adhesive.
Finally glue the felt back under your piece, and that piece is ready to be used with the module. Of course you can also replace the old felt with new felt if you want to.
Piece programming
Once you pieces have been RFID-equipped, place them in the regular starting position on the board and switch on the module. Once the module is started, take one piece and place it near the module. You will hear a triple beep sound that indicates that the piece has been programmed. Place the piece back into its position and repeat the operation with the other 31 pieces.
This procedure needs to be done only once as the tags keep their programming forever, but the tags can be programmed as many times as you want.
You can test the piece programming by clearing the board, taking a piece, placing it near the module, then you will hear a single beep sound that indicates that the piece has been scanned. Then place it on the board and the correct piece should show up on the screen.
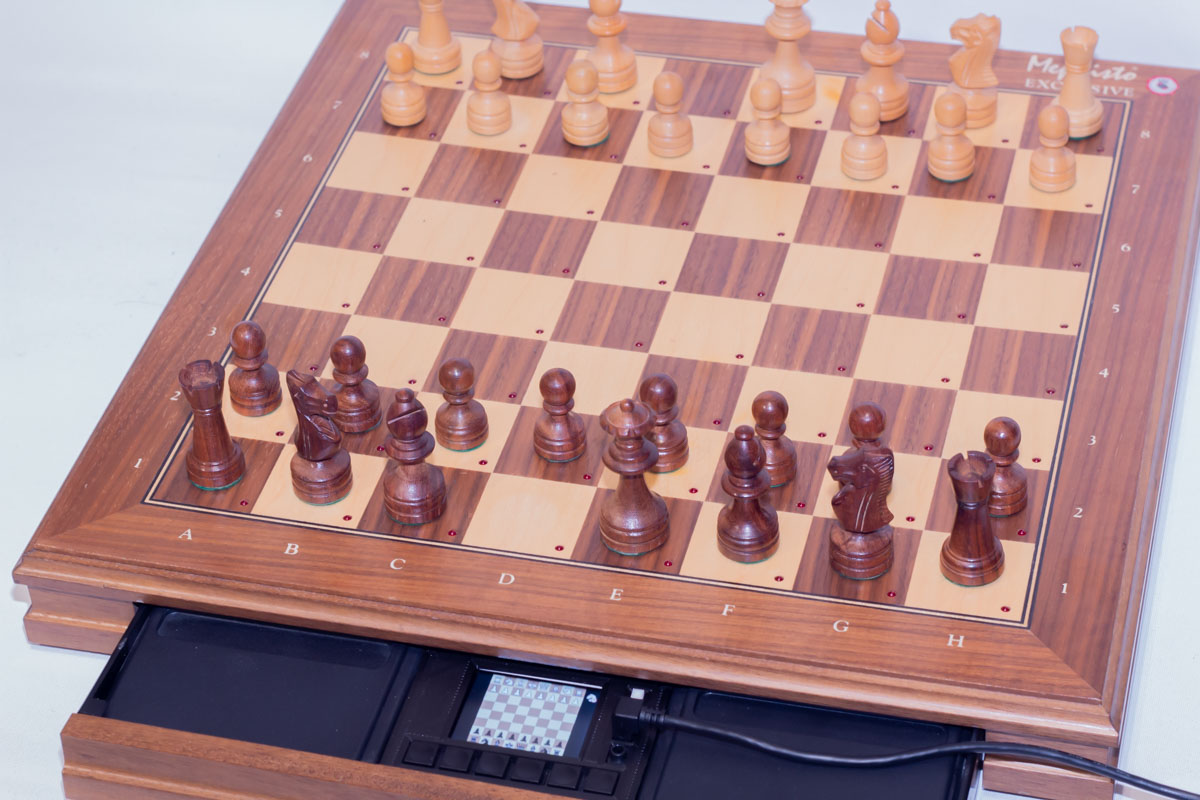
Setting up the board
When you start the module, if the pieces are placed in the regular starting position the module will recognize them all, and you can play normally from there.
Anytime the module detects that all the 32 pieces are in the 1st,2nd,7th and 8th rows, it will assume that you are setting up the starting position and recognize all the pieces, and you can play normally from there.
Anytime the module detects that there are no pieces outside the 1st,2nd,7th and 8th rows, and you are placing more unknown pieces in the 1st,2nd,7th and 8th rows, after 4 unknown pieces have been placed it will assume that you are setting up a starting position, and the pieces will be automatically recognized from that point on.
Of course you can set-up a different position by clearing all the board, taking one piece, scanning it and placing it on the board. Repeat the operation with as many pieces as you want to set-up the complete position.
Play with Reversed board
To play with a reversed board (play with black pieces in the first rows) place the pieces normally on the board with the black pieces in front of you. Then take the two kings off the board and place them back. The board will then be reversed and that will be shown on the screen, and you can play normally from there.
Moving pieces
Try to place the pieces as centered as possible in its squares. This is a general requirement for Mephisto boards.
The module will make a beep sound everytime you lift a piece and everytime you place a piece. If you play logical movements it will always identify correctly the piece at its destination square and show it accordingly on the screen.
Piece slide is not recommended at this point, you should always lift and place the pieces you move. Future updates could allow or improve piece sliding support.
For taking pieces it is irrelevant if you lift first the taking or the taken piece, it will work both ways.
Promotion
When promoting a pawn to a queen, advance the pawn to the last row and then take it off the board and place the queen (or any other piece that will act as a queen) in its place.
When promoting a pawn to a piece diffent than a queen, advance the pawn to the last row and then take it off the board. Then you need to scan with the module the piece you want to promote to. Take that piece and place it on the module, you will hear a beep sound to indicate that it has been scanned. Then place it on the board in the appropiate square.
When promoting a pawn to a piece diffent than a queen in a situation where you don’t hava a piece to scan (for example, to promote to a knight when you already have your two knights on the board) you can temporary take a similar piece to scan (in the example one of your knights), scan it, place it back and then place any other piece instead of the promoted pawn. That other piece will act as the desired piece.
Take back movements
The module will detect all the played movements and you will be able to take them back. When taking back a capture, complete first the back movement and then place the taken piece back. The taken piece will appear on the screen when you complete then back movement to indicate it has to be placed on the board. Be careful not to misplay any back movement, as the module may lose track of the movements in that case.
Using with a DGT 3000 clock
You can use a DGT-3000 clock with DGT-compatible apps like Picochess. With Elfacun turned off connect the clock to the module using a stereo mini-jack to mini-jack cable. Shorter cables are recommended as the I2C signal will not work with longer cables. Someting like a 50cm cable will work. Someting like a 2m cable won’t work. Something in between may or may not work.
When you turn on the module, the clock will be automatically detected and used with the apps.
To indicate the correct clock orientation, the clock lever should be up at white’s side at module startup. This cannot be changed when the module is already started. If you play with a reversed position the clock times will be automatically switched to the right side.
The clock buttons will be functional, as well as the module buttons emulating the clock buttons.
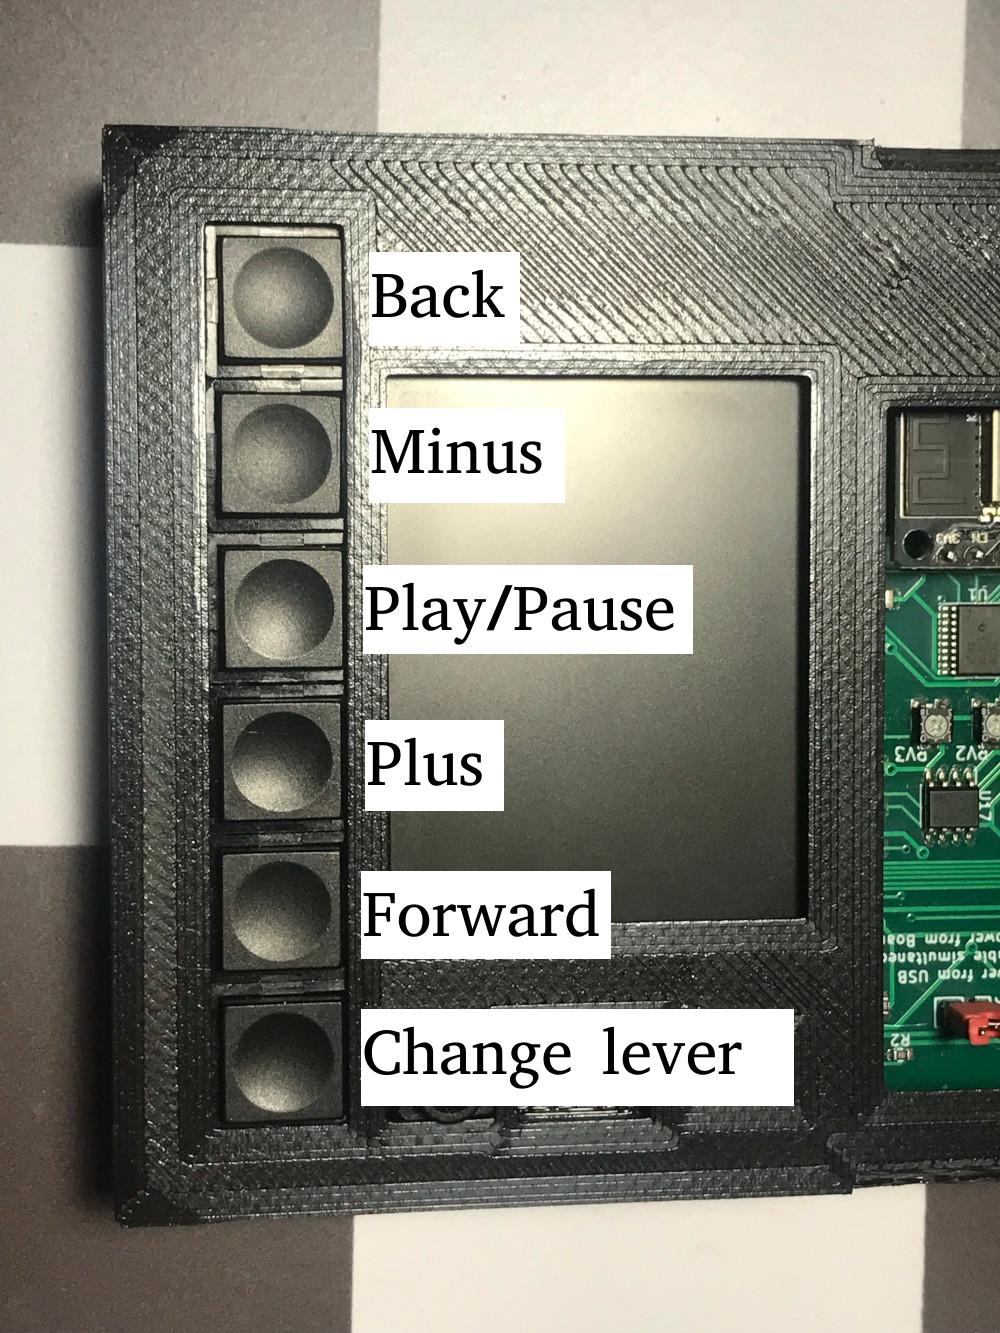
The first 5 module buttons (stating on the leftmost) emulate the 5 DGT-3000 front buttons. The sixth module button emulates the clock lever (changes the lever position with every button press).
If you don’t plug a real DGT-3000 clock, the module will emulate one while in mode A. The module buttons will be fully operational and messages and times will be shown on the screen.
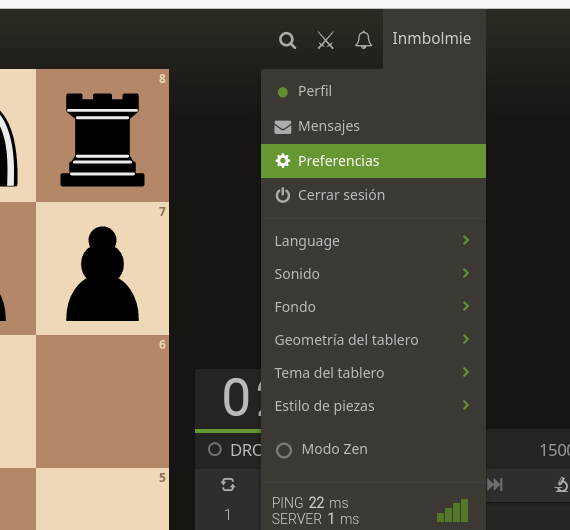
Lichess mode
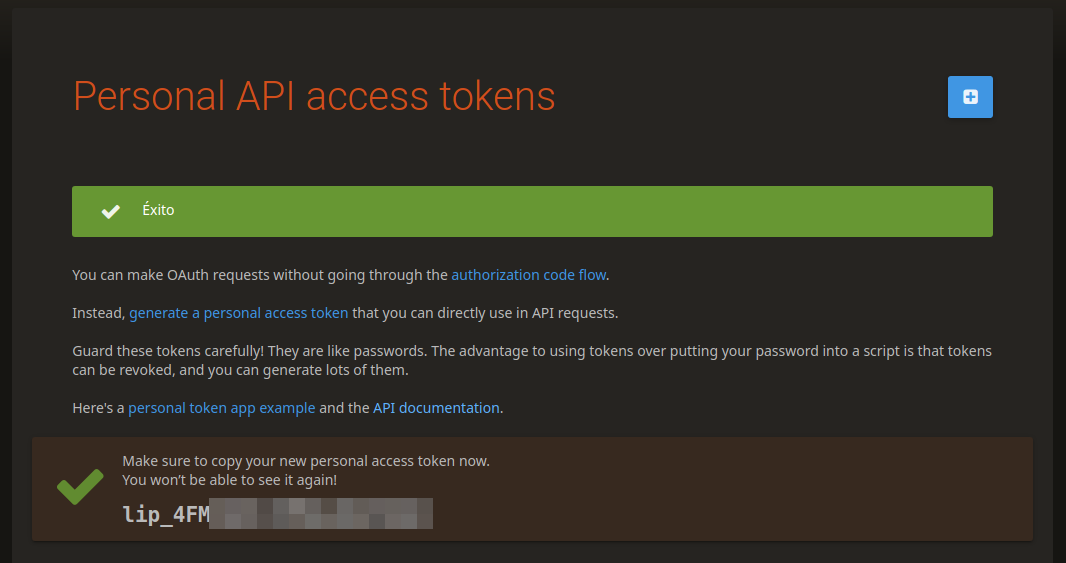
To use Lichess mode you will need to generate an authentication token in the website.
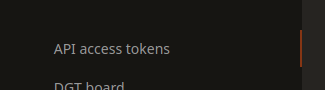
Log into lichess.org and enter into your “preferences” menu option:
On the side menu select “API access tokens”
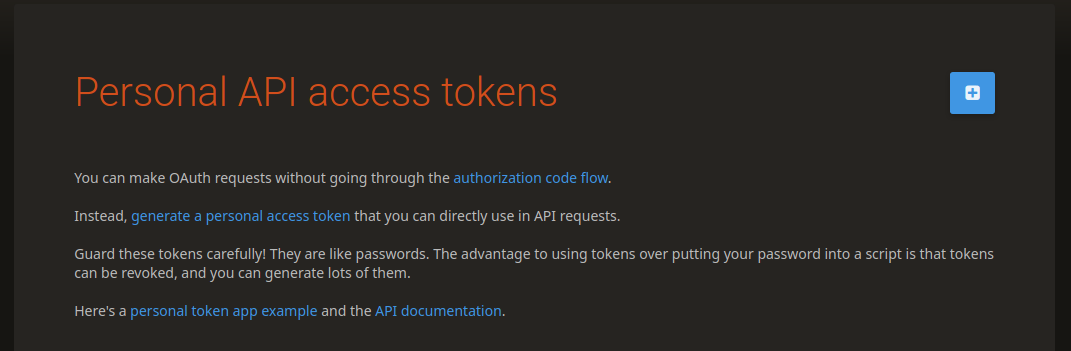
Click on “generate a personal access token”
Give the token access to the following features:
- Read preferences
- Read incoming challenges
- Create, accept, decline challenges
- Play Games with the board API
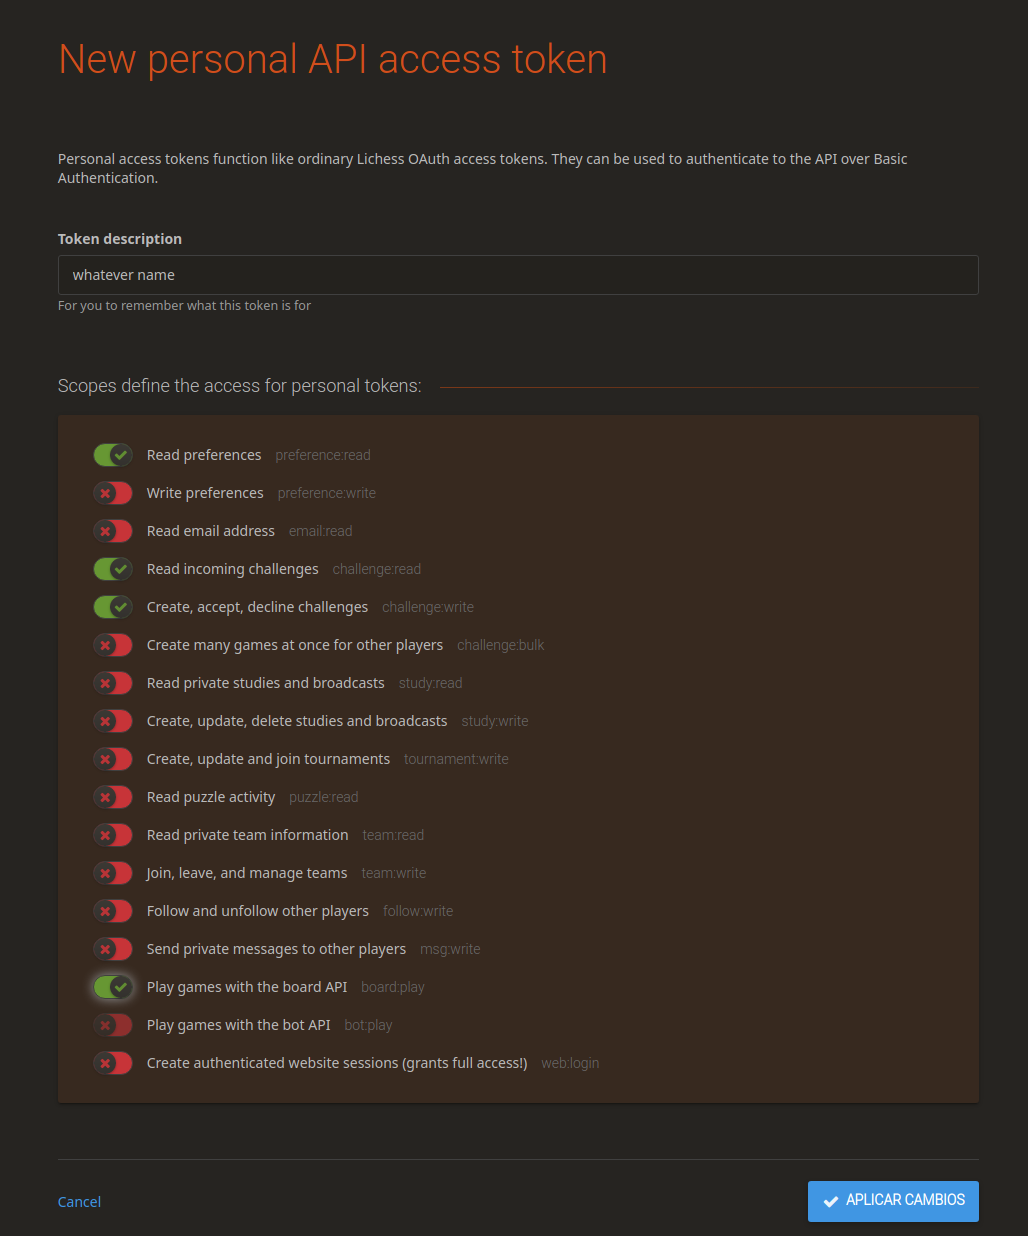
Press “apply” and now you have generated your access token, that you will have to copy into Elfacun configuration. Make sure you write it down somewhere as you won’t be able to see it again on the website.
Now that you have a token, you will have to configure it using the settings.txt file in a SD card. The mandatory parameters for Lichess mode are:
- lichess.wifi.ssid: Your WIFI ssid
- lichess.wifi.password: Your WIFI password
- lichess.wifi.authtoken: Authentication token generated from your lichess.org account
- lichess.board.autoinvert: If board will be automatically inverted when you play as black
After configuring that parameters, when starting in Lichess mode, the module will automatically connect and start streaming Lichess.tv games. The stream will continue until a new game is detected. A new game can be started by:
- Starting a game outside the module, for example on the web or in a mobile app.
- Launching a challenge from the module.
You can launch a challenge from LichessTV pressing twice one of the six module buttons. Every button represents one play mode that can be configured by the user via settings.txt and SD card.
Only “rapid” and “classic” games are supported on the Lichess board interface. The “blitz”, “bullet” or “correspondence” games cannot be played on Elfacun and won’t be shown on the module, even if you start a game on another interface. Also only the “standard” chess games are supported.
For example, to configure the first button to lauch a rated 10+0 game as random colour you will configure in settings.txt:
lichess.mode.X.time=10
lichess.mode.X.increment=0
lichess.mode.X.color=random
lichess.mode.X.rated=true
Note that after September 2024, non-random coloured challenges are no longer supported by Lichess, so if you configure a non-random coloured challenge it will be launched as a random-coloured one.
If you pressed one button but don’t want to launch the challenge, simply press a different button to cancel.
After the challenge is launched, if is successfully paired the game will be automatically detected and started.
While in a game, you can control with the module buttons some actions:
- Fourth button: Ask the opponent for taking back the last movement.
- Fifth button: Offer draw to the opponent.
- Sixth button: Resign.
You need to push the button twice for the action to be effective.
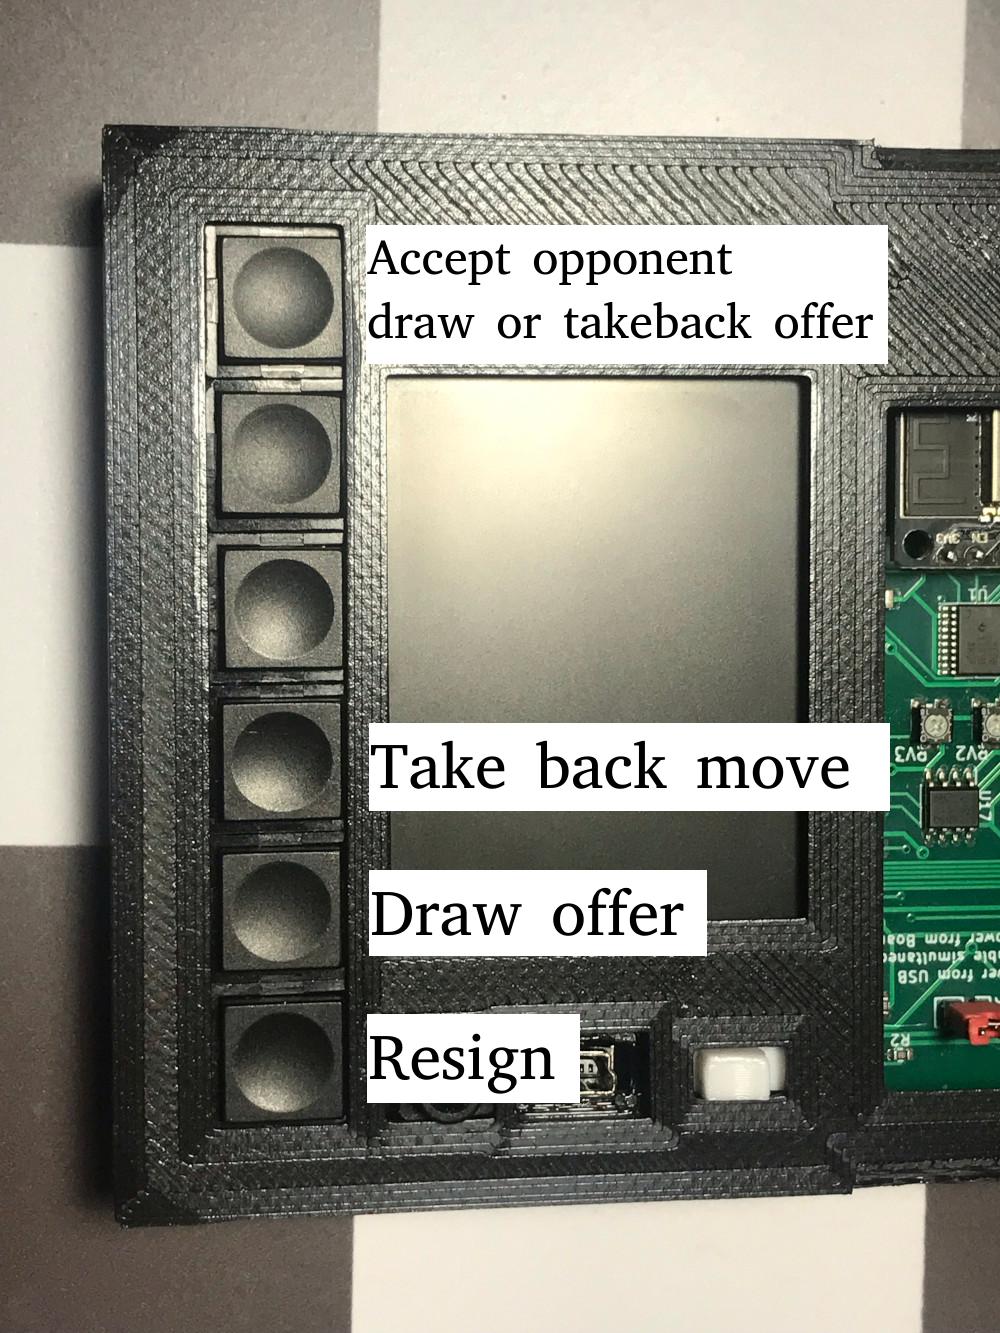
The opponent draw and takeback offers will be shown on the screen as well. You can accept them using the first button or decline it with any other button or making a piece movement.
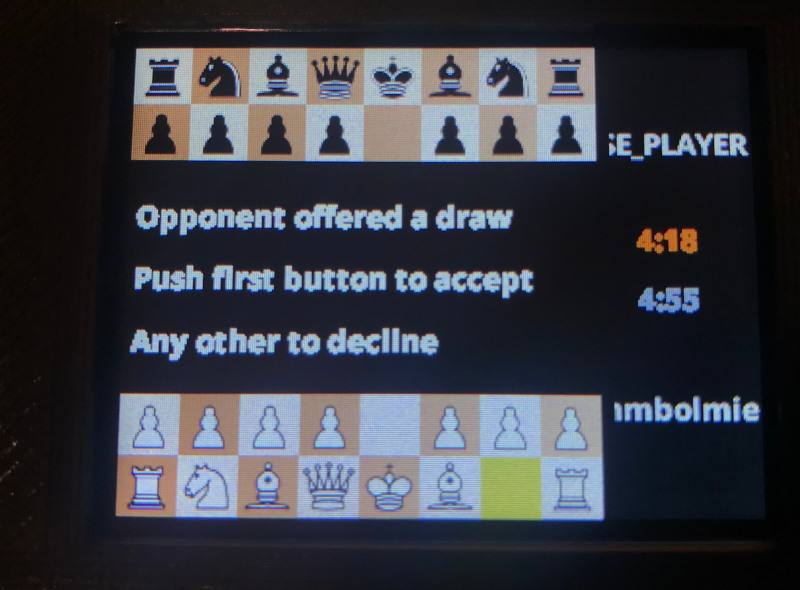
When a game ends, the module will show the result and LichessTV mode will automatically start again. You have to reach the final position for that to happen or press any module button after the game result has been shown.
While experimenting with Lichess settings, I recommend you have at hand a connected app or the session initiated on the web site, as if you launch challenges repeatedly and don’t play the games, you could be temporarily banned. Also if you want to accept or offer a rematch you won’t have time to set-up the board and make the first movement before the game is cancelled, so in that case you have to make the first move on the other interface and then you can set-up the board with that position that will be indicated on the screen.
On Lichess mode there is no “piece recognition” as such. The pieces simply have to be in the same positions that the screen shows, that is the position on Lichess servers.
The LEDs will flash:
- To indicate an incoming movement (origin square, destination square)
- When a piece is on a square that should be empty
- When no piece is on a square that should be occupied
On Lichess mode your movements are not instantly reflected on the screen because the screen is updated only after the new position is received from Lichess and the confirmed position received back by the module. A good WIFI signal strength is recommended to make this process faster.
Note that sometimes if you make a valid move, even if the rest of the position is bad on the board, the move will be accepted and made on Lichess. Afterwards the true position on Lichess will be reflected on the screen, as the screen has to show what is on Lichess servers. So it is important while on Lichess mode to be careful moving your pieces and the opponent pieces as you are playing against humans and all the moves you make are definitive.
Promotion and underpromotion
About promotion in Lichess by default when you put the pawn in the eight rank the module will assume that you want to promote it to a queen. If you want to underprote it to a different piece, you have to scan with the module the piece you want to promote to before placing the piece on the last rank. It is important to remember that you have to scan the piece BEFORE placing it on the last rank, and do not place the pawn, just place the piece instead of the pawn. Once placed, if you haven’t scanned the piece beforehand, the module will assume that you want to promote a queen and will be too late to change your mind as the movement will be already sent.
To scan the destination piece, you actually can use a piece of the other colour. So for example, to promote to a white knight you can scan a white knight as well as a black knight if you want to.
On-screen Wifi signal quality indicator
It is vital for the module to operate properly to have proper Wifi signal strength. This is a particular device in the sense that the Wifi antenna is located very inconveniently, as it lies flat inside the module that is inserted in the board under a very thick chessboard PCB that blocks part of the signal coming from and going to the Wifi access point. So in general you can expect a much lower range for the module than you can get on other devices like your mobile phone and so.
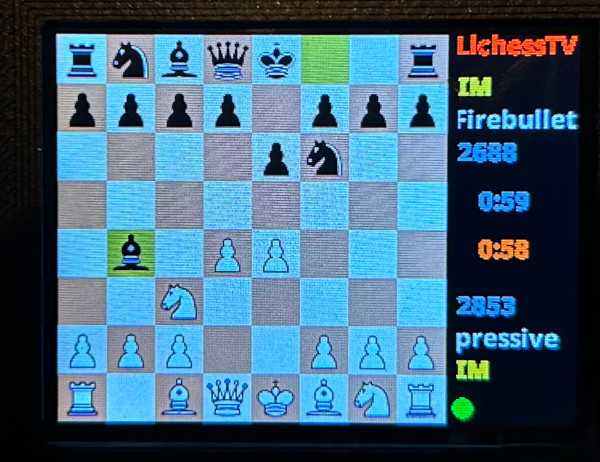
So to have good feedback about the signal quality the module is experiencing I have added an on-screen signal quality indicator when on Lichess mode. It is a coloured dot next to the lower part of the board picture:
- Green dot indicates good signal
- Orange dot indicates weak signal
- Red dot indicated bad or intermittent signal
This way you will be able to distinguish if an issue is just a signal quality issue and you just have to be closer to your access point, or if it is something else:
You objective should be to get a green most of the time, mostly green with some orange will be OK Mostly orange means you may have issues, the module can operate slower than ideal. If you see red, you most likely will have problems. If you can’t get closer to the access point you should consider switching to an external app like White Pawn, or installing a Wifi repeater in the room where you have the board.
Automatic recovery of Lichess games
In the event of power loss or module reboot while on a Lichess game, the module will automatically start on Lichess mode and reconnect to continue the game where it was, no need to press any button. You still can force it to boot on another mode by pressing the buttons if you want to.
Using Elfacun with Picochess
We will show how Picochess can be configured to connect to Elfacun using Bluetooth. A Raspberry pi 3B+ or 4 is recommended for running Picochess. Of course you can also connect Elfacun to picochess using USB.
For this test an image of Picochess V3 on a Raspberry PI 3B+ has been used.
https://groups.google.com/g/picochess/c/jCuWSm0EDH8?pli=1
You will need access to a Picochess command line, you can get it on its desktop, or remotely via VNC or SSH.
First you need to know the module MAC address. With Elfacun started in mode A, open a console in Picochess and execute the following command:
sudo hcitool -i hci0 lescan
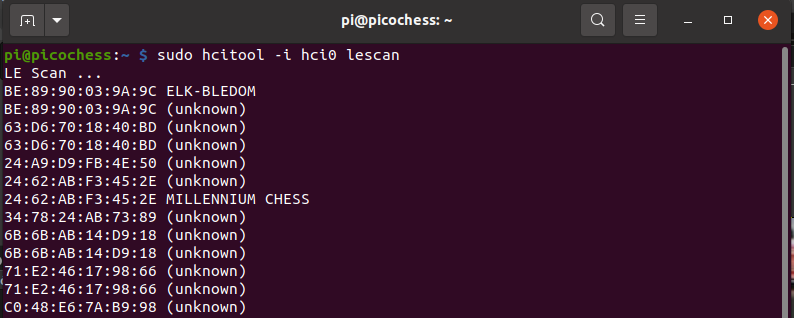
Here you see that Elfacun MAC address is 24:62:AB:F3:45:2E. The address will be different on each Elfacun module.
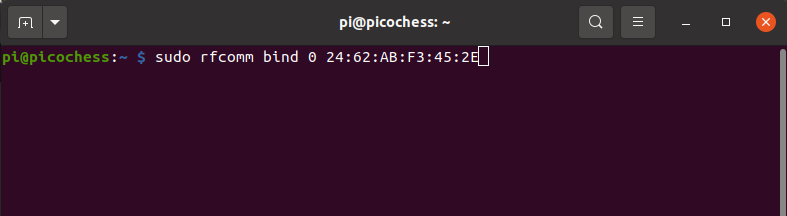
Into the same console execute the following command where you need to indicate your module MAC address.
sudo rfcomm bind 0 XX:XX:XX:XX:XX:XX
For example if your module MAC were 11:22:33:44:55:66 you would need to execute:
sudo rfcomm bind 0 11:22:33:44:55:66
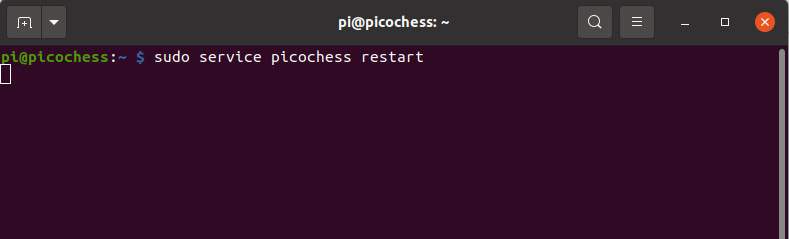
And now Picochess should detect the module, if it isn’t, restart picochess
If you want Revelation-II leds to be enabled you need to make a small code modification in Picochess.
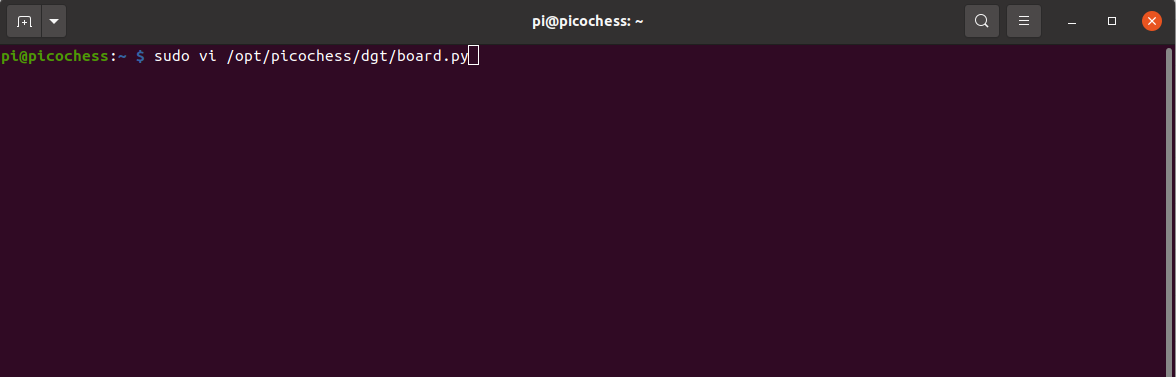
Open a text editor with vi or the text editor of your choice and edit this file:
/opt/picochess/dgt/board.py
You need to modify this line so that self.is_revelation = True and self.is_pi = True
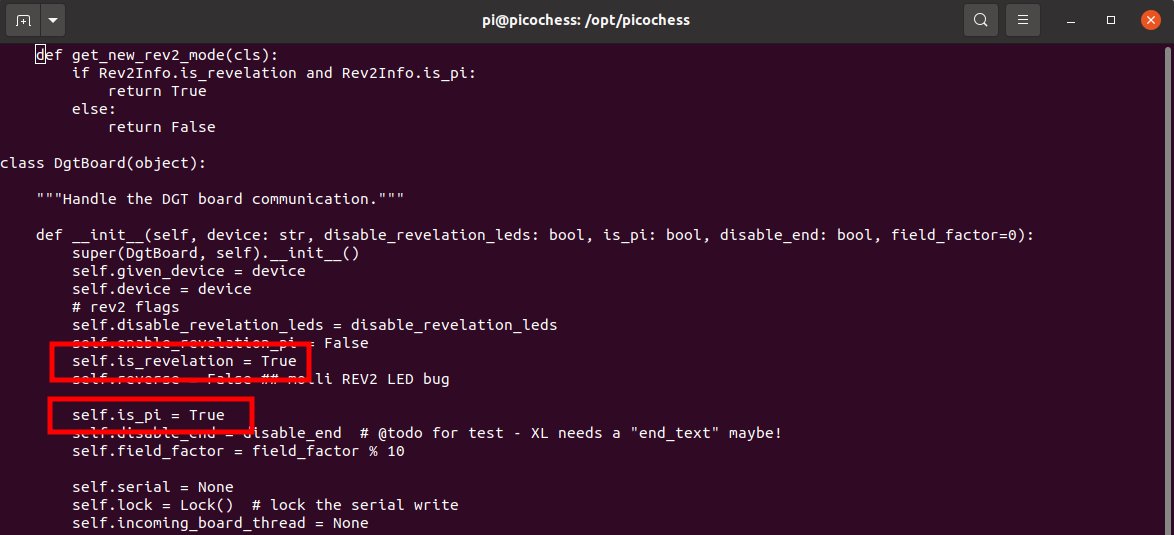
Once modified, save the file and restart Picochess, and now Revelation II LED support should be enabled and the computer movements will be indicated on the board.
Connecting via USB
No special configuration is needed. Simply start the module in mode A or B depending on the protocol you want to use.
On windows machines you may need to install the USB-to-serial driver for the ESP32. If so, follow the instructions here to install it: https://docs.espressif.com/projects/esp-idf/en/latest/esp32/get-started/establish-serial-connection.html. For the ESP32 boards I’ve been using so far, the relevant driver is the CP210x driver.
Connecting via Bluetooth
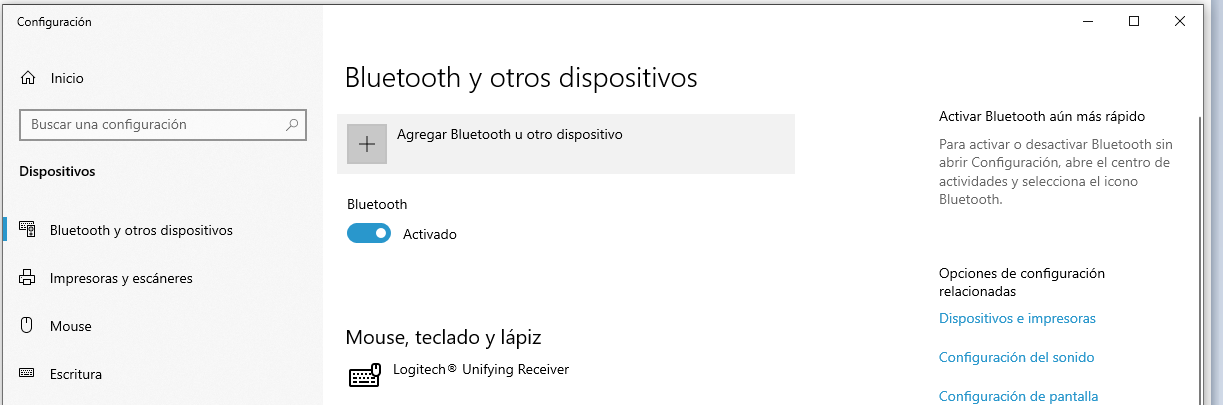
We will show an example of how to configure a Bluetooth connection in LucasChess Windows. The configuration for Rabbitplugin or other programs should be similar.
Open the Bluetooth configuration and push the button to add a new device. Start Elfacun in mode A.
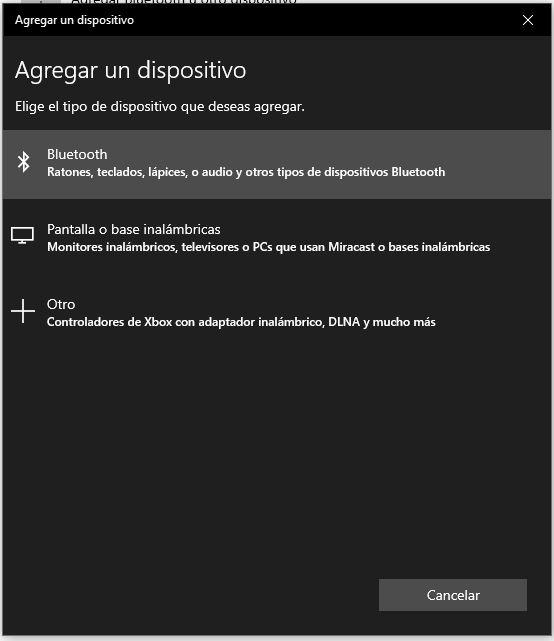
The module should appear on the list of detected devices. If more than one device appears it should be that one marked with a “computer” icon
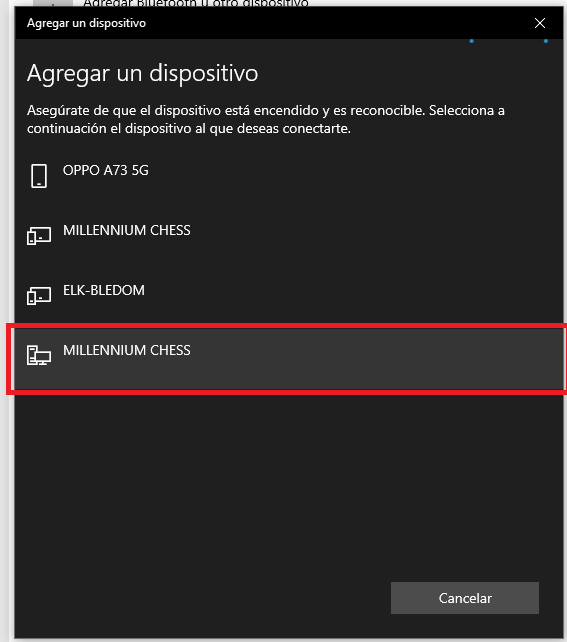
Push the device to add it.
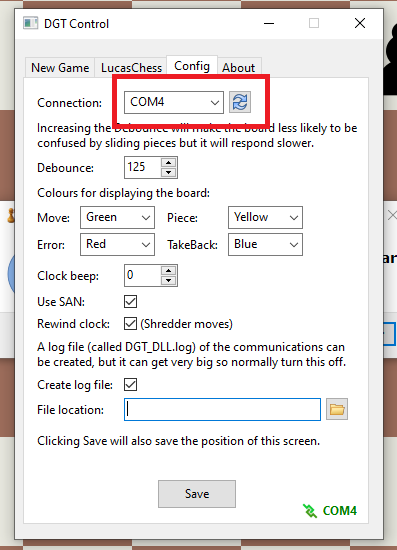
Now that the module has been paired, a couple of serial ports should have appeared in the device manager under “COM and LPT ports” section. One of those ports is the port you have to indicate in the driver configuration.
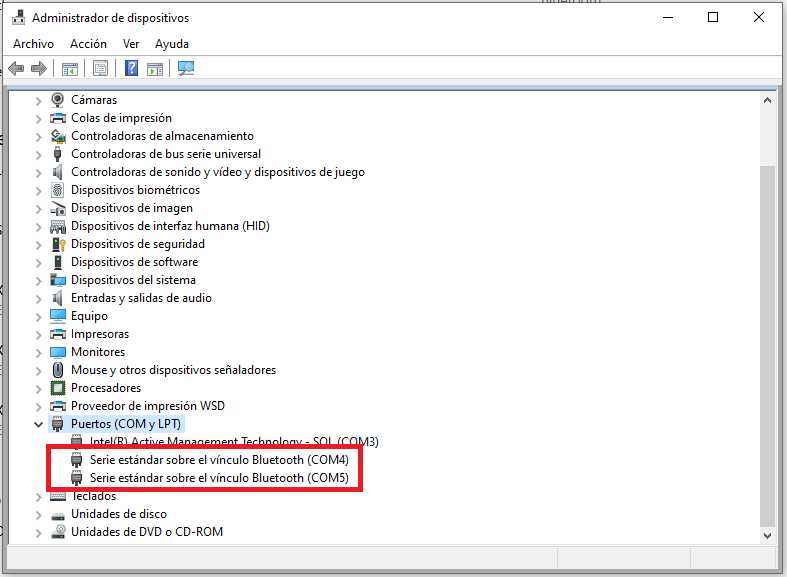
Once we have configured the port in LuchasChess it detects the module and it is ready to go.
Connecting via BLE
Using Elfacun with BLE connectivity cannot be easier. Just turn on the module in mode A or mode B and the module will be detected by any compatible application. Be warned that some applications expect the module to identify with a specific Bluetooth name. The name that the device uses to identify itself can be configured by the user.
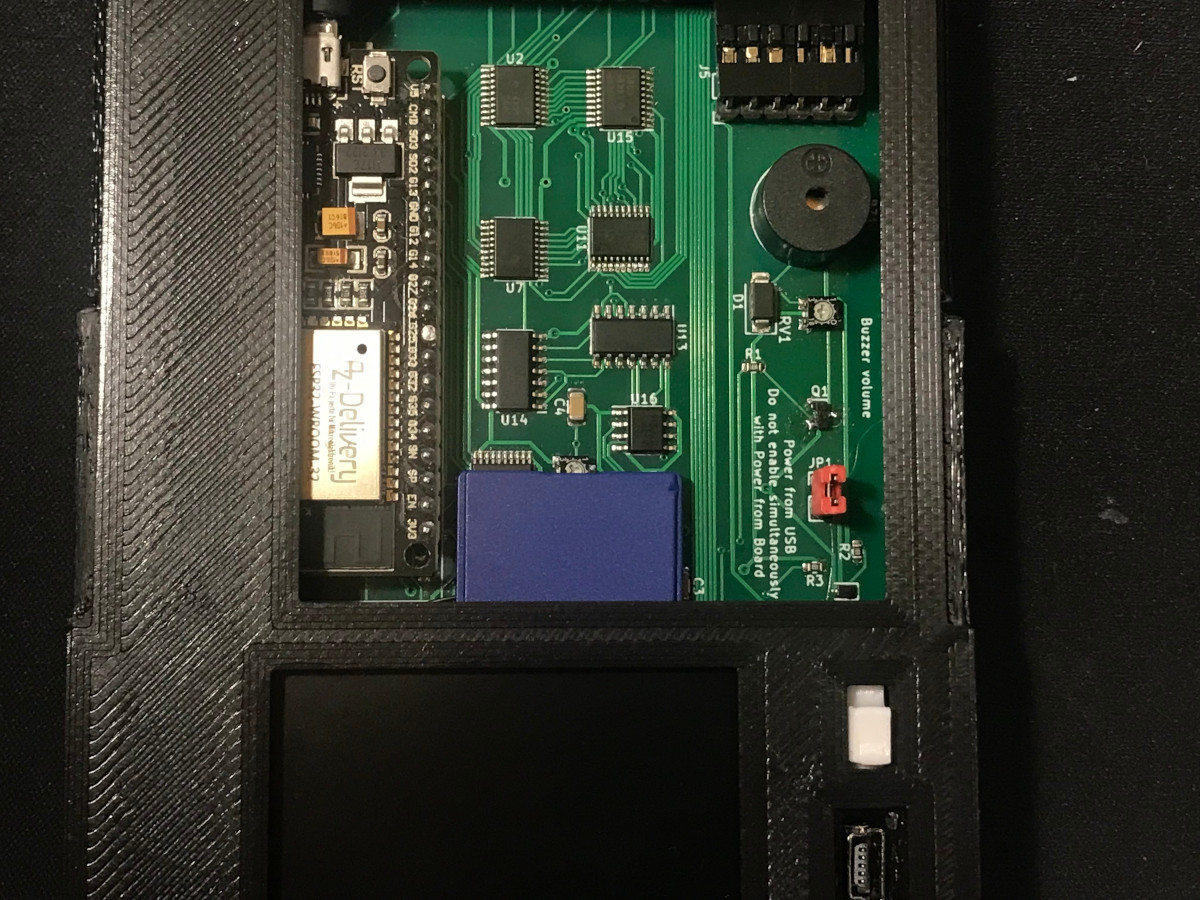
Adjusting buzzer volume
The buzzer volume can be modified adjusting the variable resistor RV1. It can also be entirely turned off via configuration. The resistor is a little tricky to adjust as it is very sensitive, so it can be difficult to get it to the desired volume.
Update Elfacun Software
You can update the module software putting an update file into an SD card, inserting the SD into the module and turning the module on.
It is recommended that the module is not inserted into the board for the update, you only need to power it up from the USB cable.
Make sure the SD card you are using is NOT write-protected.
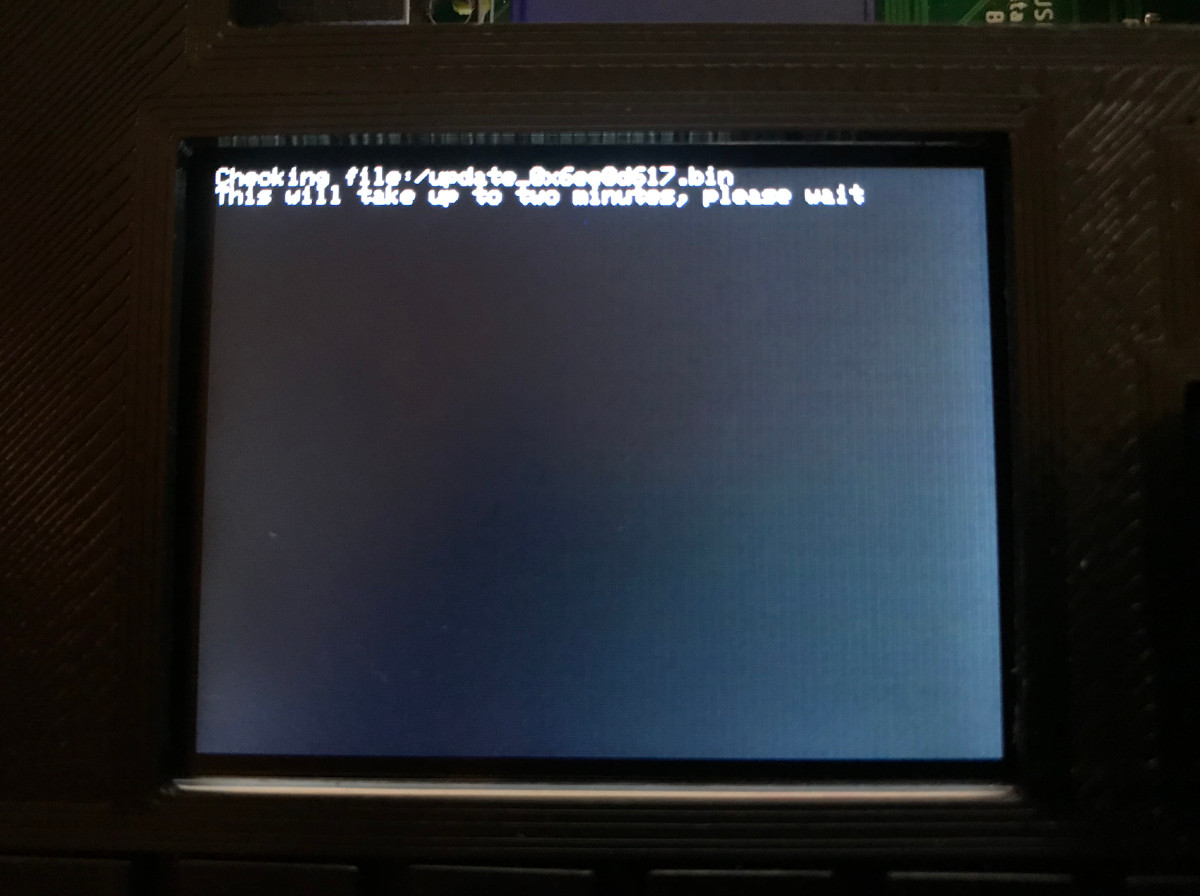
Download the update file and place it in the root directory of the SD card. The update file name will be something like update_0x6ee0d617.bin. Make sure you download the file in its entirety.
Insert the SD card into its slot behind the module screen with the contacts facing upwards like this:
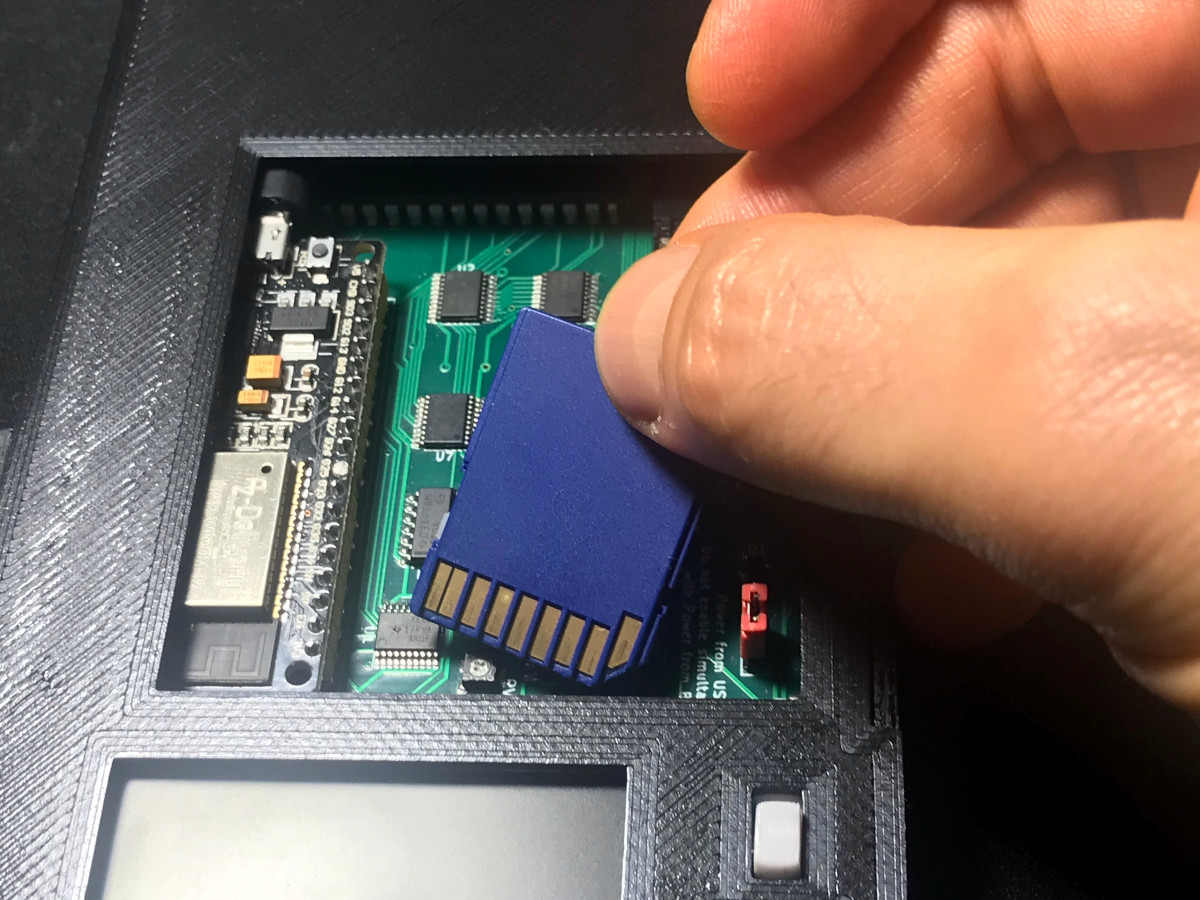
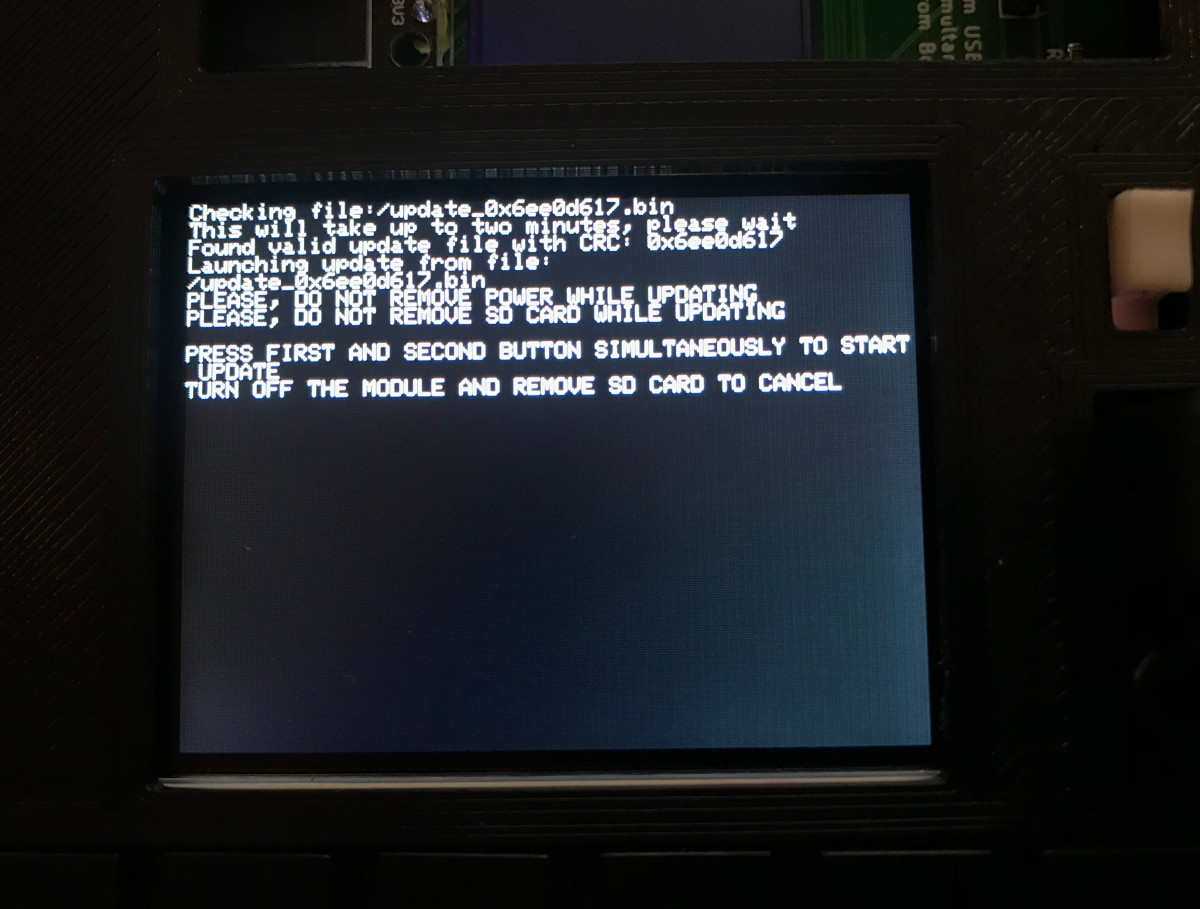
Plug the USB cable and turn the module on, if the module finds an update file into the SD card it will check it for integrity. If the integrity check failes make sure you download the correct file in its entirety. The checking process will take some time.
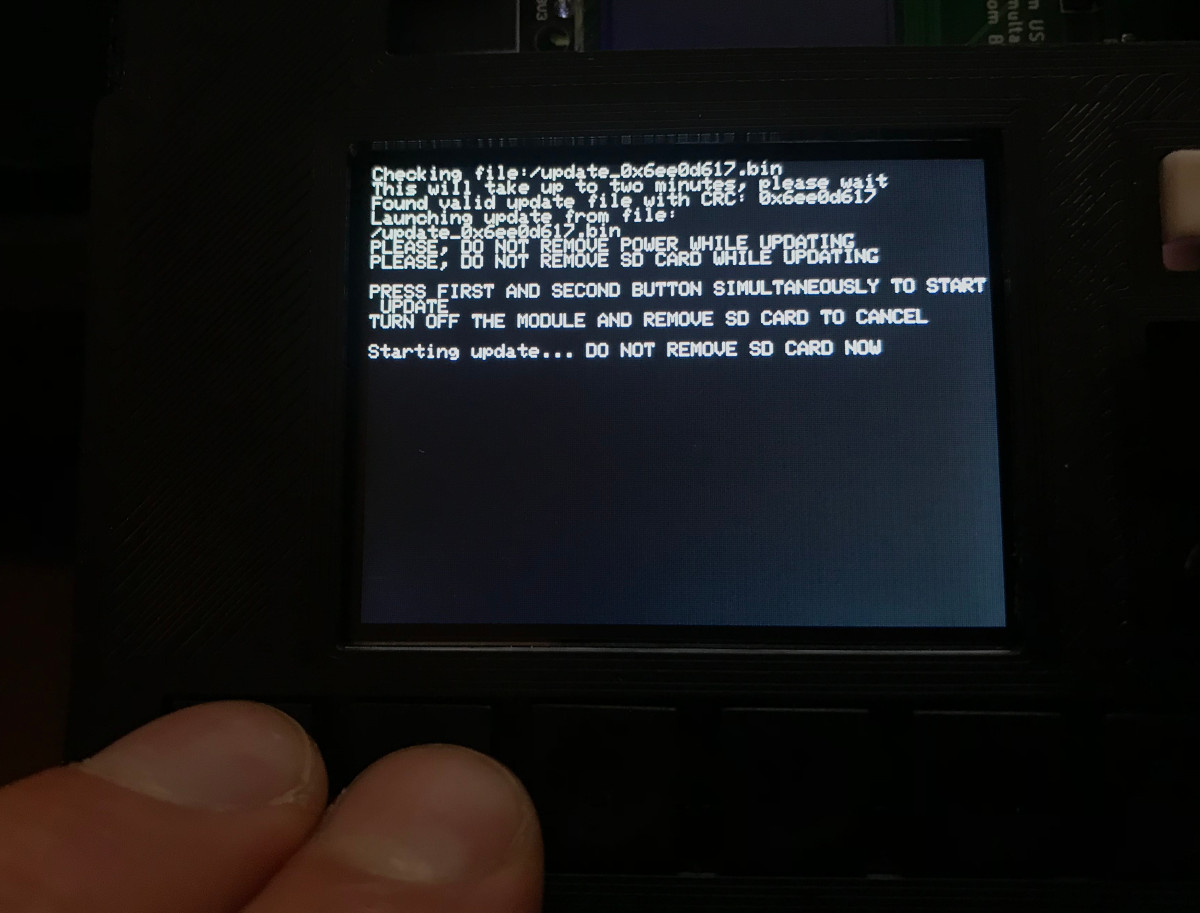
If the update file is correct, you will be prompted to confirm the update. To do so press simultaneously the two leftmost module buttons. The update process will begin.
While updating please, do not turn off the module or remove its power, as you can brick the module doing so.
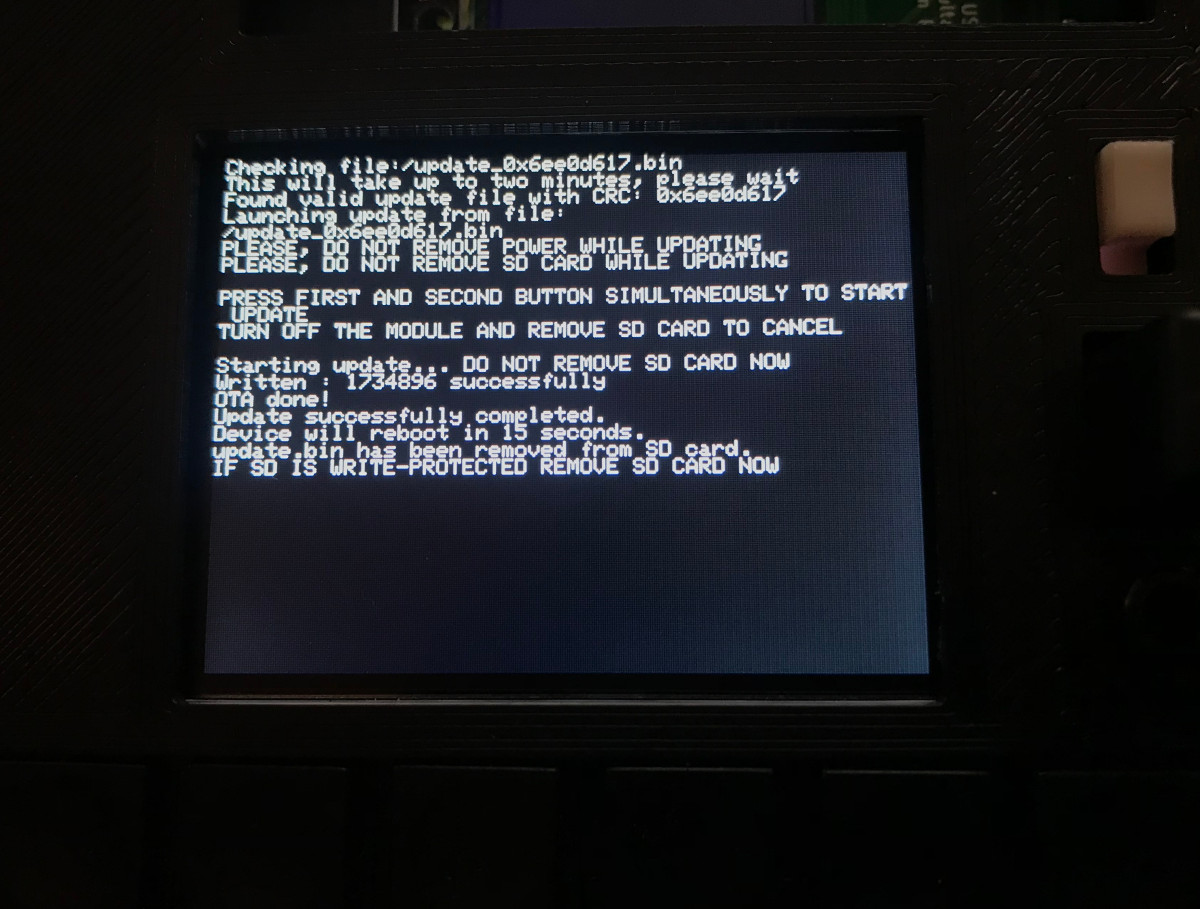
When the update is finished, the module will remove the update.bin file from the SD card, and reboot after 15 seconds. Now you can remove the SD card and use the updated module normally.
Be careful when removing the card, as it is a tight fit and can take some time. Pull it backwards in small steps grabbing it from the sides.
The SD card should not be left inserted into the module, as it could prevent the RFID reader from operating correctly.
Using Elfacun with Graham O’Neill drivers
Elfacun is compatible with Grahan O’Neill drivers via USB, Bluetooth and BLE. You can get them here:
https://goneill.co.nz/chess.php
“DGT”, “Millennium” and “Mephisto” are trademarks of their respective owners. All the trademarks are used nominatively to indicate compatibility, and do not indicate affiliation to or endorsement by the trademark owners.
New V1 and V2 features
Force passive mode
You can force passive mode if you start the module keeping the fourth leftmost button pressed. You can release the button when you see the “mode logo” screen (“mode a” or “mode b”).
Forcing passive mode is useful if Elfacun has problems to identify an external module, or if the external module freezes on startup.
Hold mode
You can enter “hold mode” by keeping at any time for a couple of seconds the second leftmost button pressed. While on hold mode, the module will stop scanning the board, keep the position and a message will be displayed that indicates that the module can be removed from the board.
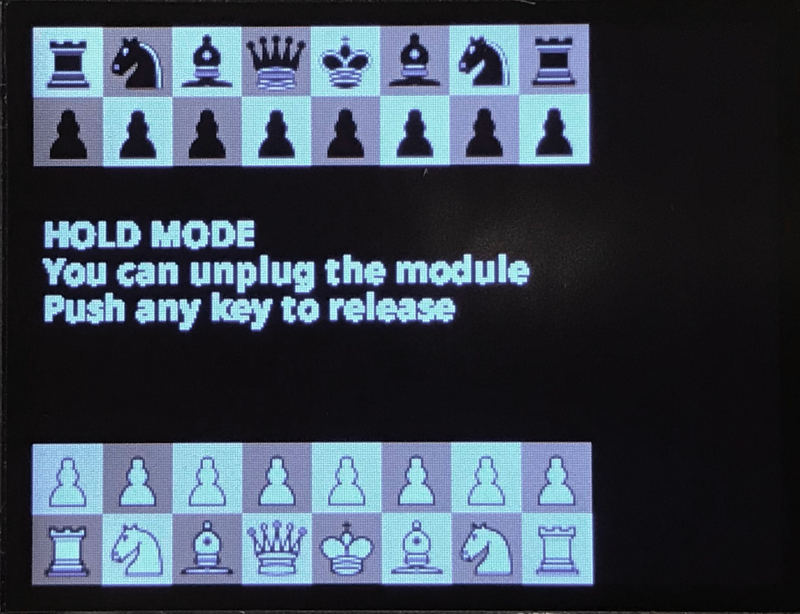
The module has to be connected to power with the USB cable to be able to be safely removed.
When you insert the module back in the board you can re-enable board scanning by pressing any button. When inserting back the module make sure that the pieces over the board are still on the same positions.
If you have software version R7 or higher as a plus if you turn off the module while on “hold mode” it will remember and restore the position on the next module startup, as long as you don’t move the pieces on the board while the module is off. To use this feature you have to remove any SD card you have inserted in the module because the stored position will be deleted on startud in that case.
Adjust BLE power
With software release R7 or higher you can now adjust the BLE signal power on the SD configuration adding this section:
#Bluetooth power
#Set the ble and bluetooth classic power level
#it can help working with devices that are far away from the board
#It is not recommended to change this value unless you have BT reliability issues
#The valid values are 0-7
#The default value is 5
#bluetooh.power=0  -----> Corresponding to -12dbm
#bluetooh.power=1  -----> Corresponding to  -9dbm
#bluetooh.power=2  -----> Corresponding to  -6dbm
#bluetooh.power=3  -----> Corresponding to  -3dbm
#bluetooh.power=4  -----> Corresponding to   0dbm
#bluetooh.power=5  -----> Corresponding to  +3dbm
#bluetooh.power=6  -----> Corresponding to  +6dbm
#bluetooh.power=7  -----> Corresponding to  +9dbm
#
#bluetooth.power=5
The default signal level is 5 for +3dbm. A higher level could help getting more range for a BLE connection. It is not recommended to change this value unless you have any problem with BLE range. The default level should work fine for devices on the same room as the module.
Adjust sound tones
With software release R7 or higher you can adjust the tone and duration of the sounds emitted by the module on the SD configuration adding this section:
#Buzzer tones setup
#You can change the frequency and duration of the sound tones:
#Tone 1 is piece raise
#Tone 2 is piece placement
#Tone 3 is led sound for passive mode
#Frequency is in hertzs
#Duration is in milliseconds
#
#buzzer.tone.1.frequency=2000
#buzzer.tone.1.duration=100
#
#buzzer.tone.2.frequency=1000
#buzzer.tone.2.duration=100
#
#buzzer.tone.3.frequency=1500
#buzzer.tone.3.duration=20
On screen LED indications
With software release R7 or higher when the module is operating in passive mode alongside an original module, the flashing LEDs from the remote app connected to Elfacun will be indicated on-screen as flashing squares and sounds.
When Elfacun is used with an original module, the original module is in full control of the board leds so it is not possible to show the remote app LEDs onboard. Now you will be able to watch them on-screen so that you can have remote movement indications without looking at the remote app interface.
If you don’t want the sounds that indicate the remote flashing leds you can disable them on the SD settings.txt adding or modifying this section:
#Buzzer enabled for passive led indications on screen
#Valid values are true, false
#Default value is true
#When in passive mode with original modules Elfacun cannot use the on-board leds
#so it uses the screen to indicate incoming led information. When this is enables the led
#indications on-screen are accompanied by sounds
#
buzzer.enabled.passive.led=true
Chessnut mode
With software release R11 or higher you can enable at startup a new mode of operation “Mode C”. While on “Mode C” any Chessnut-compatible app should be able to connect to the module via Bluetooth BLE.
To start the module in “Mode C” Keep pressed simultaneously the first and second buttons while booting.
While on “Mode C” you won’t be able to connect to the module using the Chesslink protocol.
Then once started you should be able to connect using BLE from any Chessnut-compatible app.
Scally homage Screen
Alan ‘Scally’ Cooper was a key contributor of this project. His help was crucial to get the V2 universal compatibility, the Diablillo interface and a lot of the firmware improvements over the time. He sadly passed away in 2024, and as a homage to him I have included a brief homage screen to appear on every module startup starting on release R14. To enable this screen you have to add this to your settings.txt configuration and load it on the module with the SD card:
scally.homage=true

Chess 960 mode
With software release R15 or higher you can enable the Chess 960 mode and play Chess 960/Fischer Random starting positions with any compatible app.
To enable this mode you have to keep pushed the third leftmost button for 1-2 seconds. The screen will indicate “960” when this mode is activated. If you want to play with the black pieces on front, you have to keep the button pushed for longer, like 4-5 seconds to enter the “board inverted 960 mode”.

To configure the starting position, once in 960 mode you have to place first all the pawns, white and black on the second and seventh ranks, like this:

Now you can place all the pieces, but you have to do it exactly in the following order:
- King
- Queen
- Both rooks
- Both bishops
- Both knights
You can place first the white pieces or first the black pieces, the orden in colour doesn’t matter.

Once placed, if you got it wrong or you want to change the position, you have to remove the pieces and start again from the “only pawns” position and follow again the indicated order.
There are several online sites where you can generate Chess 960/Fischer Random positions like this one: https://wlabe.com/chess960
You can return to the “regular chess” mode by keeping pushed again the third leftmost button for 1-2 seconds.
Chessconnect mode
This mode will help if you have issues with the moves indicated by the board LEDs when using the Chessconnect app.
Chessconnect is a chrome web extension and mobile app that allows owners of smart chessboards to connect to various chess sites. https://chessconnect.de/
Chessconnect has been reported to work well with Elfacun, but contrary to other applications it doesn’t always lit all the four corners of a square to indicate some movements if those corners belong to another square that is also indicated. For example, to indicate a movement from E7 to E6 first all four corners of E7 are lit, then only the two lower leds of E6 are lit because the top leds of E6 are common leds between E7 and E6.
So to properly recognize those LED patterns you can enter into the new Chessconnect mode. For that you have two options:
- You can leave pressed the fourth leftmost button after starting the module (you will see “CC” indicated on the screen)
-
You can add the following parameter to your configuration to leave it on by default:
chessconnect.mode=true
In theory this mode will work with any other app but it limits the animation capabilities of the board so it is not enabled by default.
V2 only features
Dual leds mode
To use dual leds, you need at least one V2 module. Dual leds will work with V1+V2 or V2+V2, but not with two V1 modules.
When you use two Elfacun modules compatible with this feature in the same board, the passive module will recognize the active one on startup and it will send to it LED updates via BLE during the game. That way both chess apps willbe able to indicate their moves on the board leds.
If you are using V1 and V2 modules you have to start V1 first. If using only V2 modules the boot order is irrelevant .
You have to make sure that no app connects to the modules via BLE before both modules are fully started. If that happens the feature won’t work but the modules will work otherwise fine. When the connection is established you will see an “X” LED pattern for a couple of seconds, then all the LEDs will turn off. After that you are free to connect apps to the modules the way you want.
You have to enable this feature using a new parameter on the SD card’s settings.txt file. This feature is disabled by default because it makes the module startup a little slower.
#DUAL LEDS enabled (Only V2 modules)
#Valid values are true, false
#Default value is false
#When a V2 module starts in passive mode and this parameter is enables, the module will scan for the
#presence of other Elfacun module (V1 or V2) using BLE. If it finds it, it will start a BLE connection to
#relay its LED status, so both modules will be able to control the board LEDs
#It is disabled by default as it only makes sense if you have two modules and with the feature disabled the
#passive mode startup will be faster
#
leds.dual.enabled=false
Adjust screen brightness
- To increase screen brightness keep pressed the module’s rightmost button.
- To decrease screen brightness keep pressed the module’s leftmost button.
- The setting will be stored and remembered on startup.
You can override the stored setting using a new parameter on the SD card’s settings.txt file.
#Screen brightness (Only V2 modules)
#Only for V2 modules, will be ignored on V1 modules
#Overrides the stored default screen brightness
#Valid values: 5-255
#Default value: 64
#
screen.brightness.default = 64
Enable or disable power from board
On V2 modules you can enable power from board installing a jumper clearly marked on the user-accesible side of the PCB.
On V1 modules follow the instructions here
“DGT”, “Millennium”, “Mephisto” and “Chessnut” are trademarks of their respective owners. All the trademarks are used nominatively to indicate compatibility, and do not indicate affiliation to or endorsement by the trademark owners.